Developers quick start guide
Introduction
Important notice
Before you complete this guide, we recommend completing the basic quick start guide first so that you understand basic WebSight CMS concepts.
This guide uses WebSight Blueprint - our sample project which demonstrates various functionality of Websight CMS and pre-configures for you the following features:
- Demo site project Luna
- Howlite components library
- End-to-end testing
We will walk through the process of updating a simple Howlite component.
In WebSight Blueprint for the sake of simplicity, we overrode the Title component included in the Howlite collection in advance and created the Luna Title component inside the demo project.
Your task in completing this guide is to update the Luna Title component and extend existing functionality. The sections below explain more detail.
Important notice
All scripts presented below are designed for Linux-based platforms. If you are a Windows user, please install and configure Windows Subsystem for Linux (WSL) to use this guide.
Part A: Prerequisites
- Install AdoptOpenJDK 17, make sure to install the version matching your CPU architecture (on macOS use
brew install openjdk@17): - Install Git
- Optionally, install Docker Desktop.
Part B: Setup local environment
First, clone the WebSight Blueprint repository and build it within your local environment using the following commands:
Depending on your choice, you can use Docker to build and run the CMS instance or build and run it locally as a JVM application.
JVM application
Docker
Congratulations! Your local environment is now ready. To view it, open http://localhost:8080/ in a Web browser and log in using the credentials wsadmin/wsadmin.
Part C: Changing component
Hint
If you need help navigating inside WebSight, see the basic getting started guide for details.
Business requirement
Let's imagine the following scenario: A page owner wants you to update the title of the page that describes the company's new Grand Luxor Jewelry Collection.
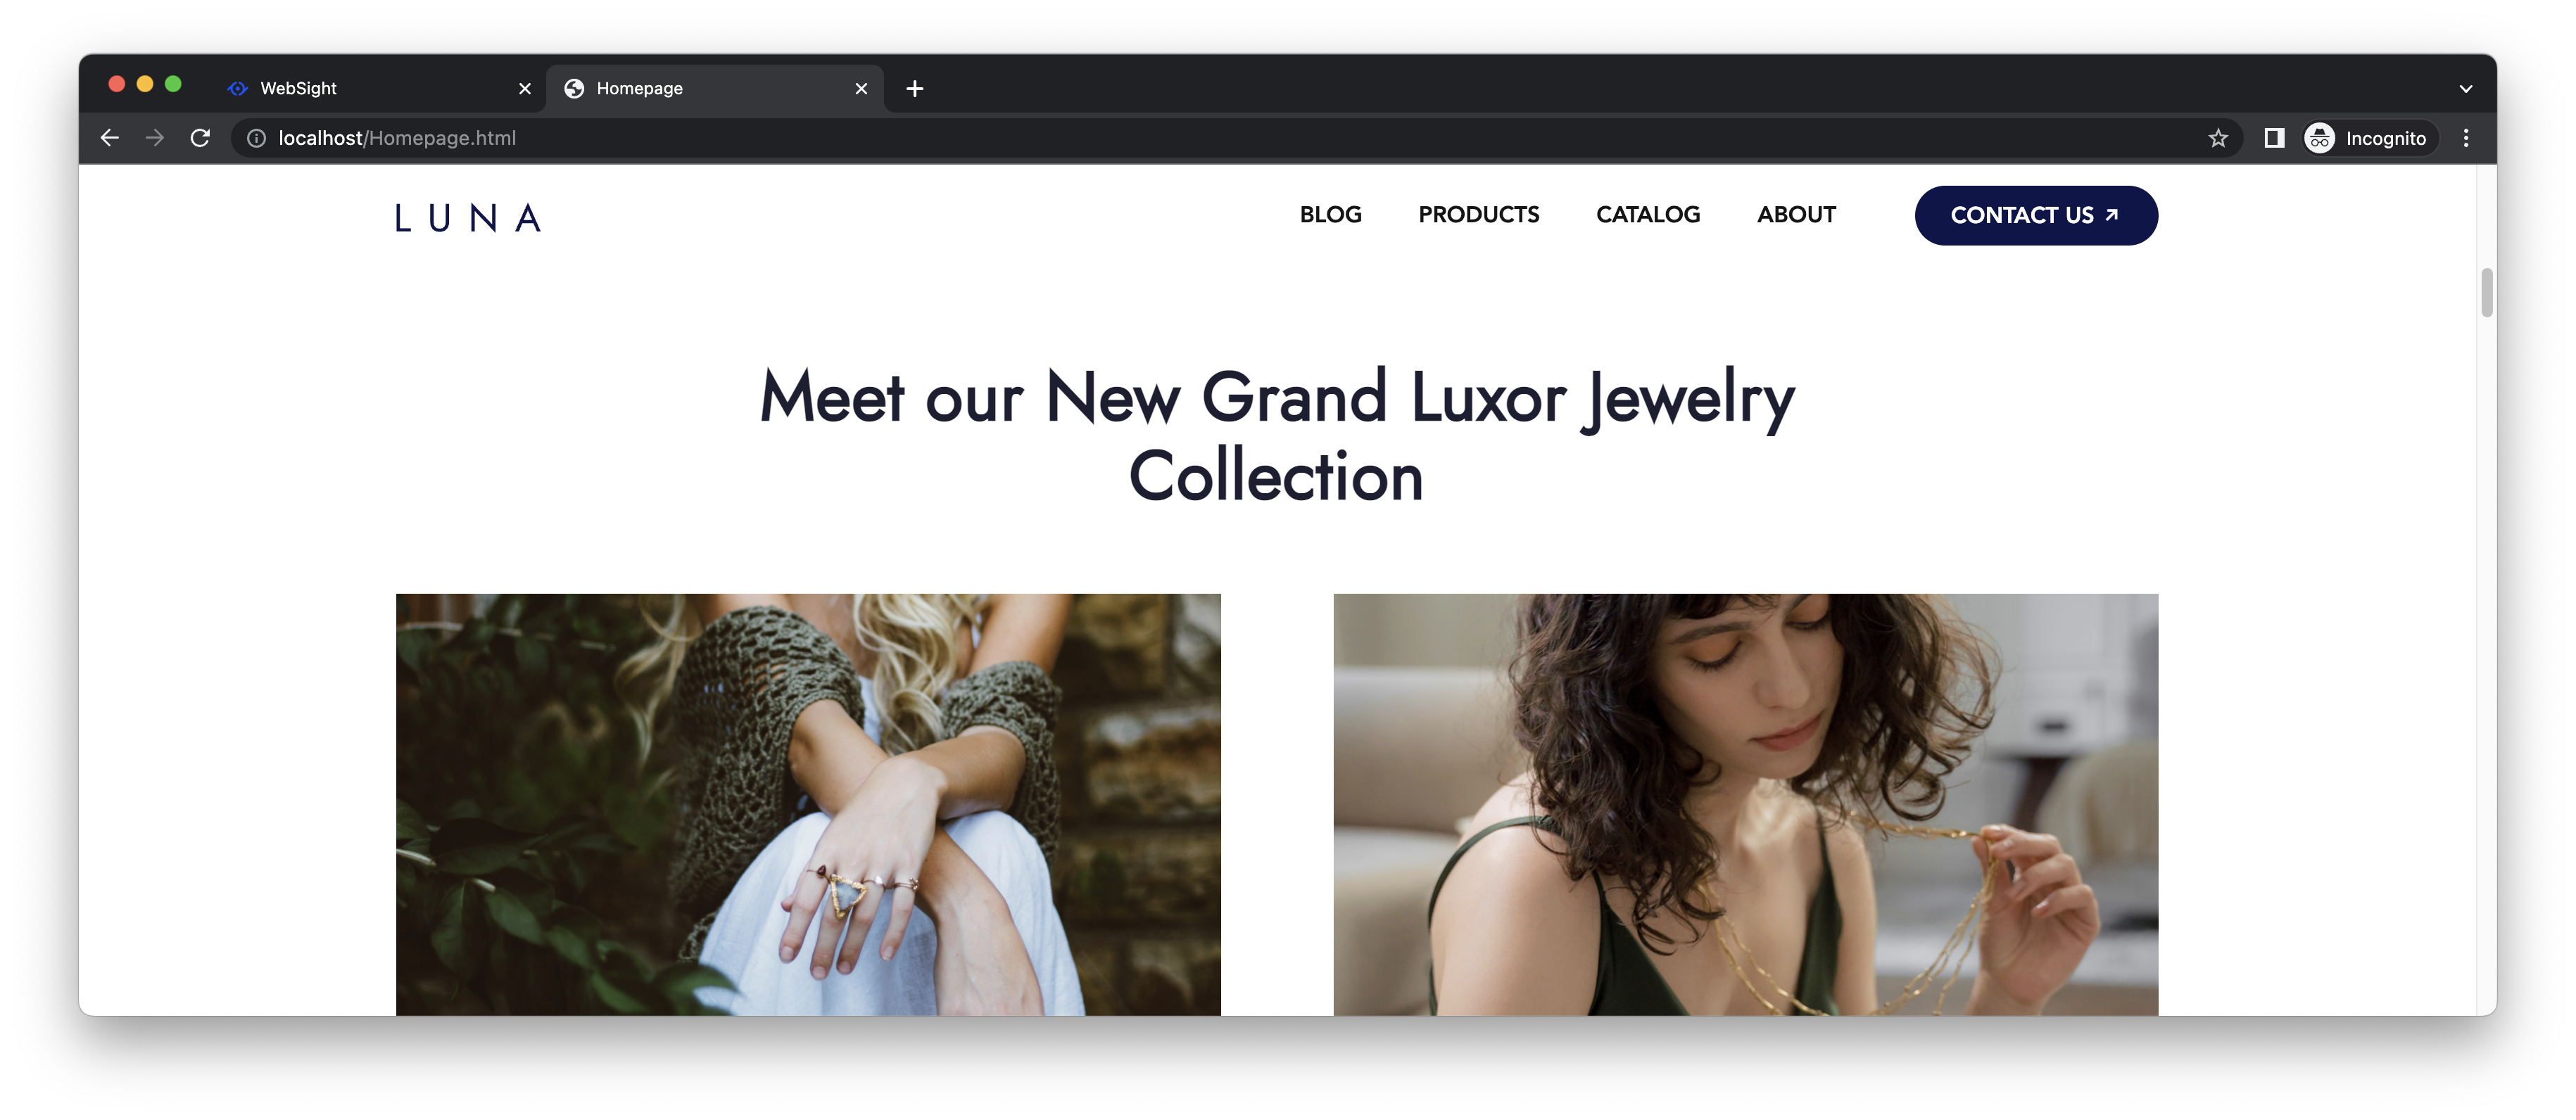
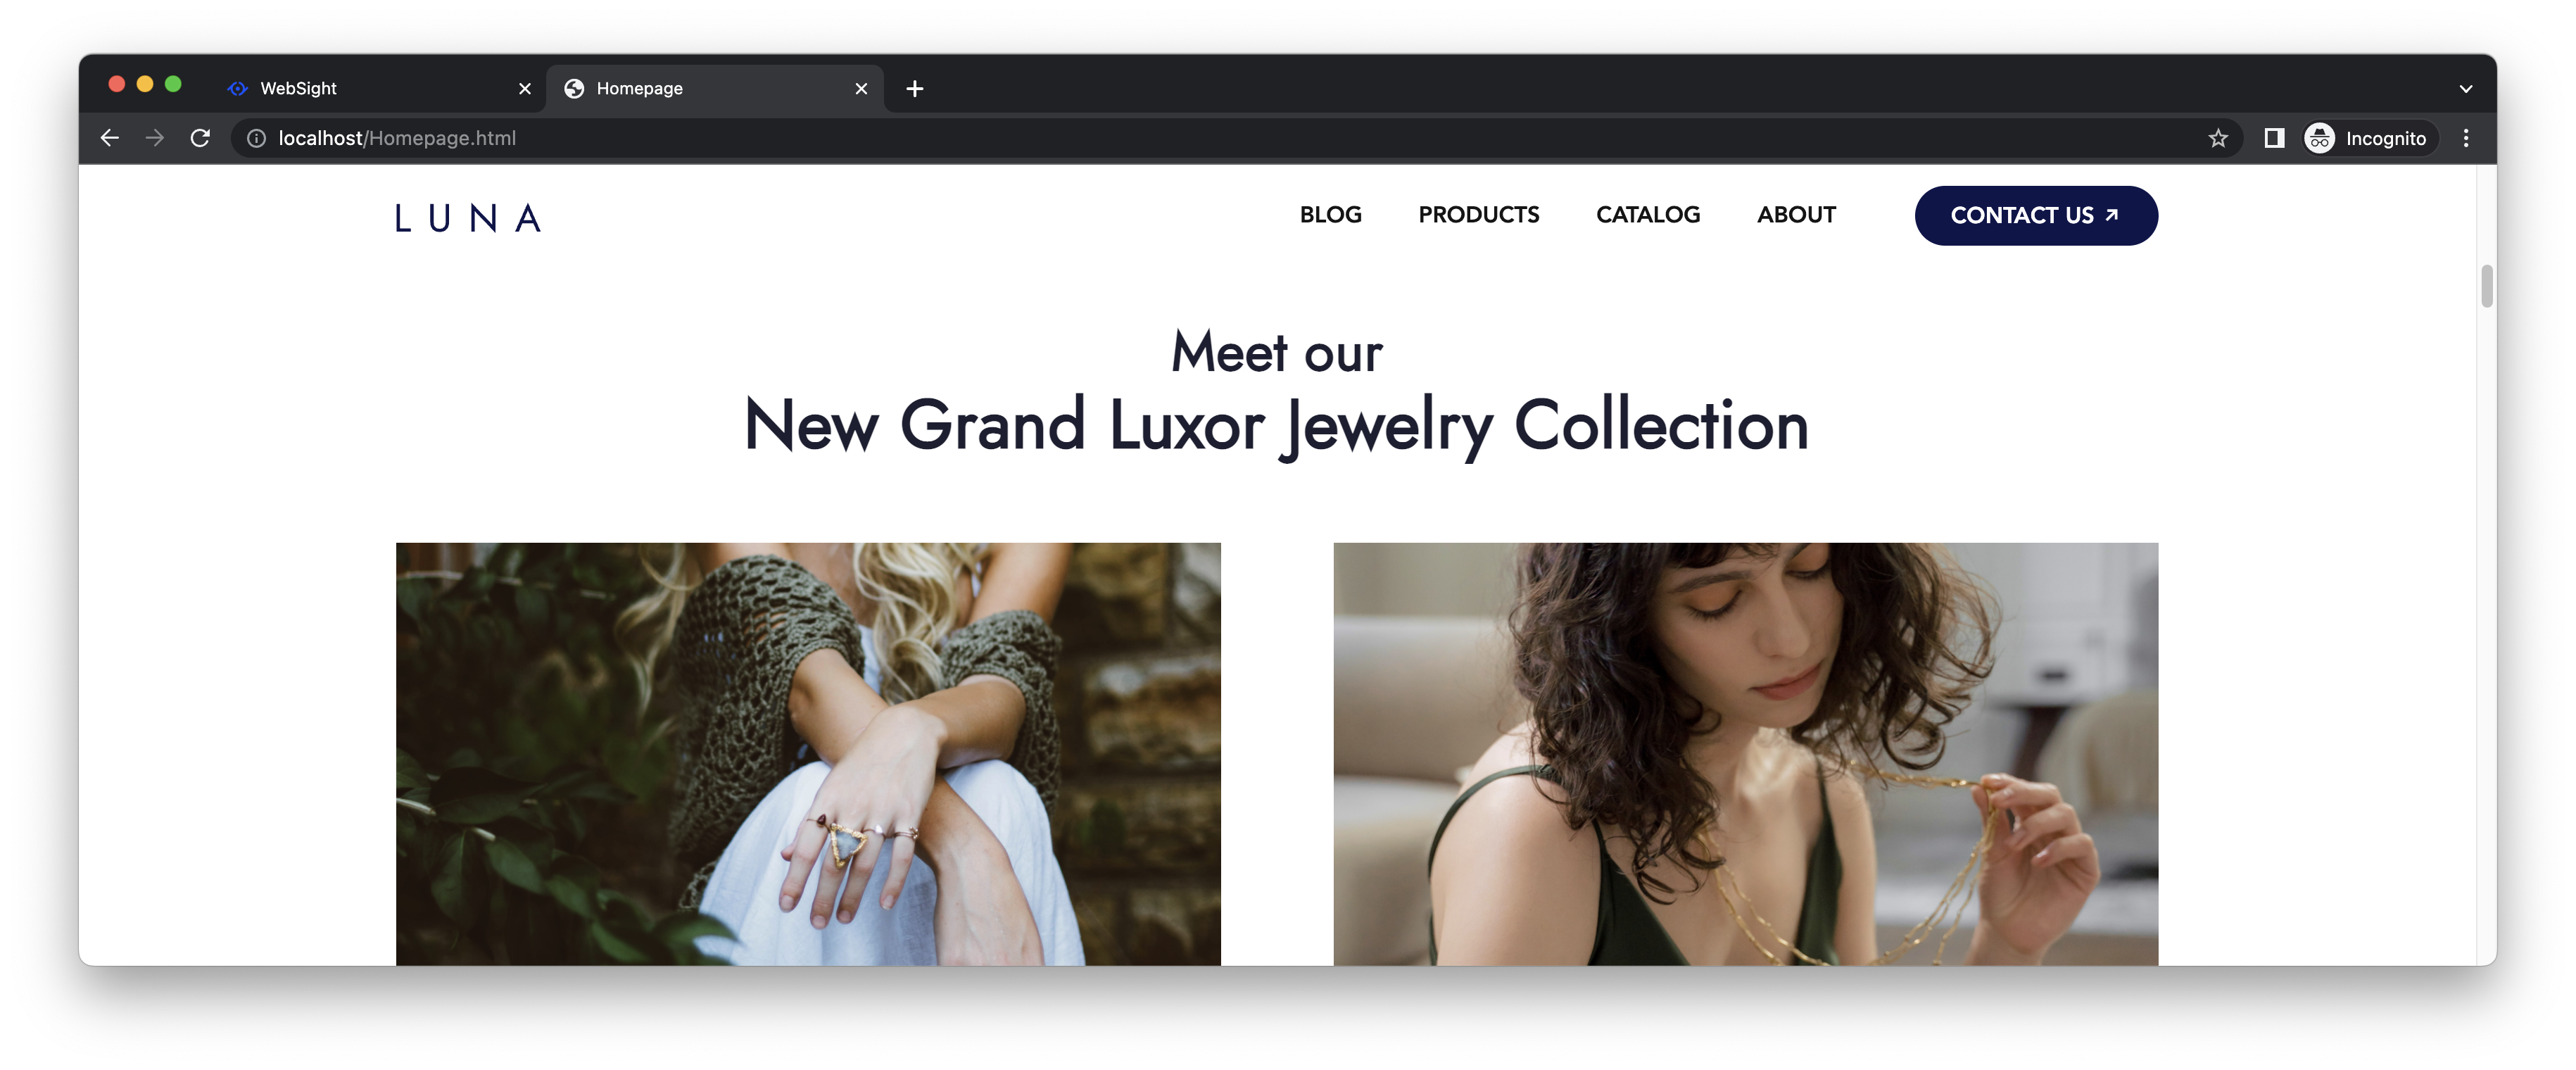
To fulfill this request, you are asked to keep the collection name on one line and decrease the font size for the text Meet our. The expected result is presented below.
Technical scope
To do this, you need to extend the Title component included in the Howlite library. Before doing that, let's check the original component first to identify the scope of changes.
Run WebSight, open the Luna space and edit the home page. Find the Title component that contains the text Meet our New Grand Luxor Jewelry Collection and edit its properties on the sidepanel.
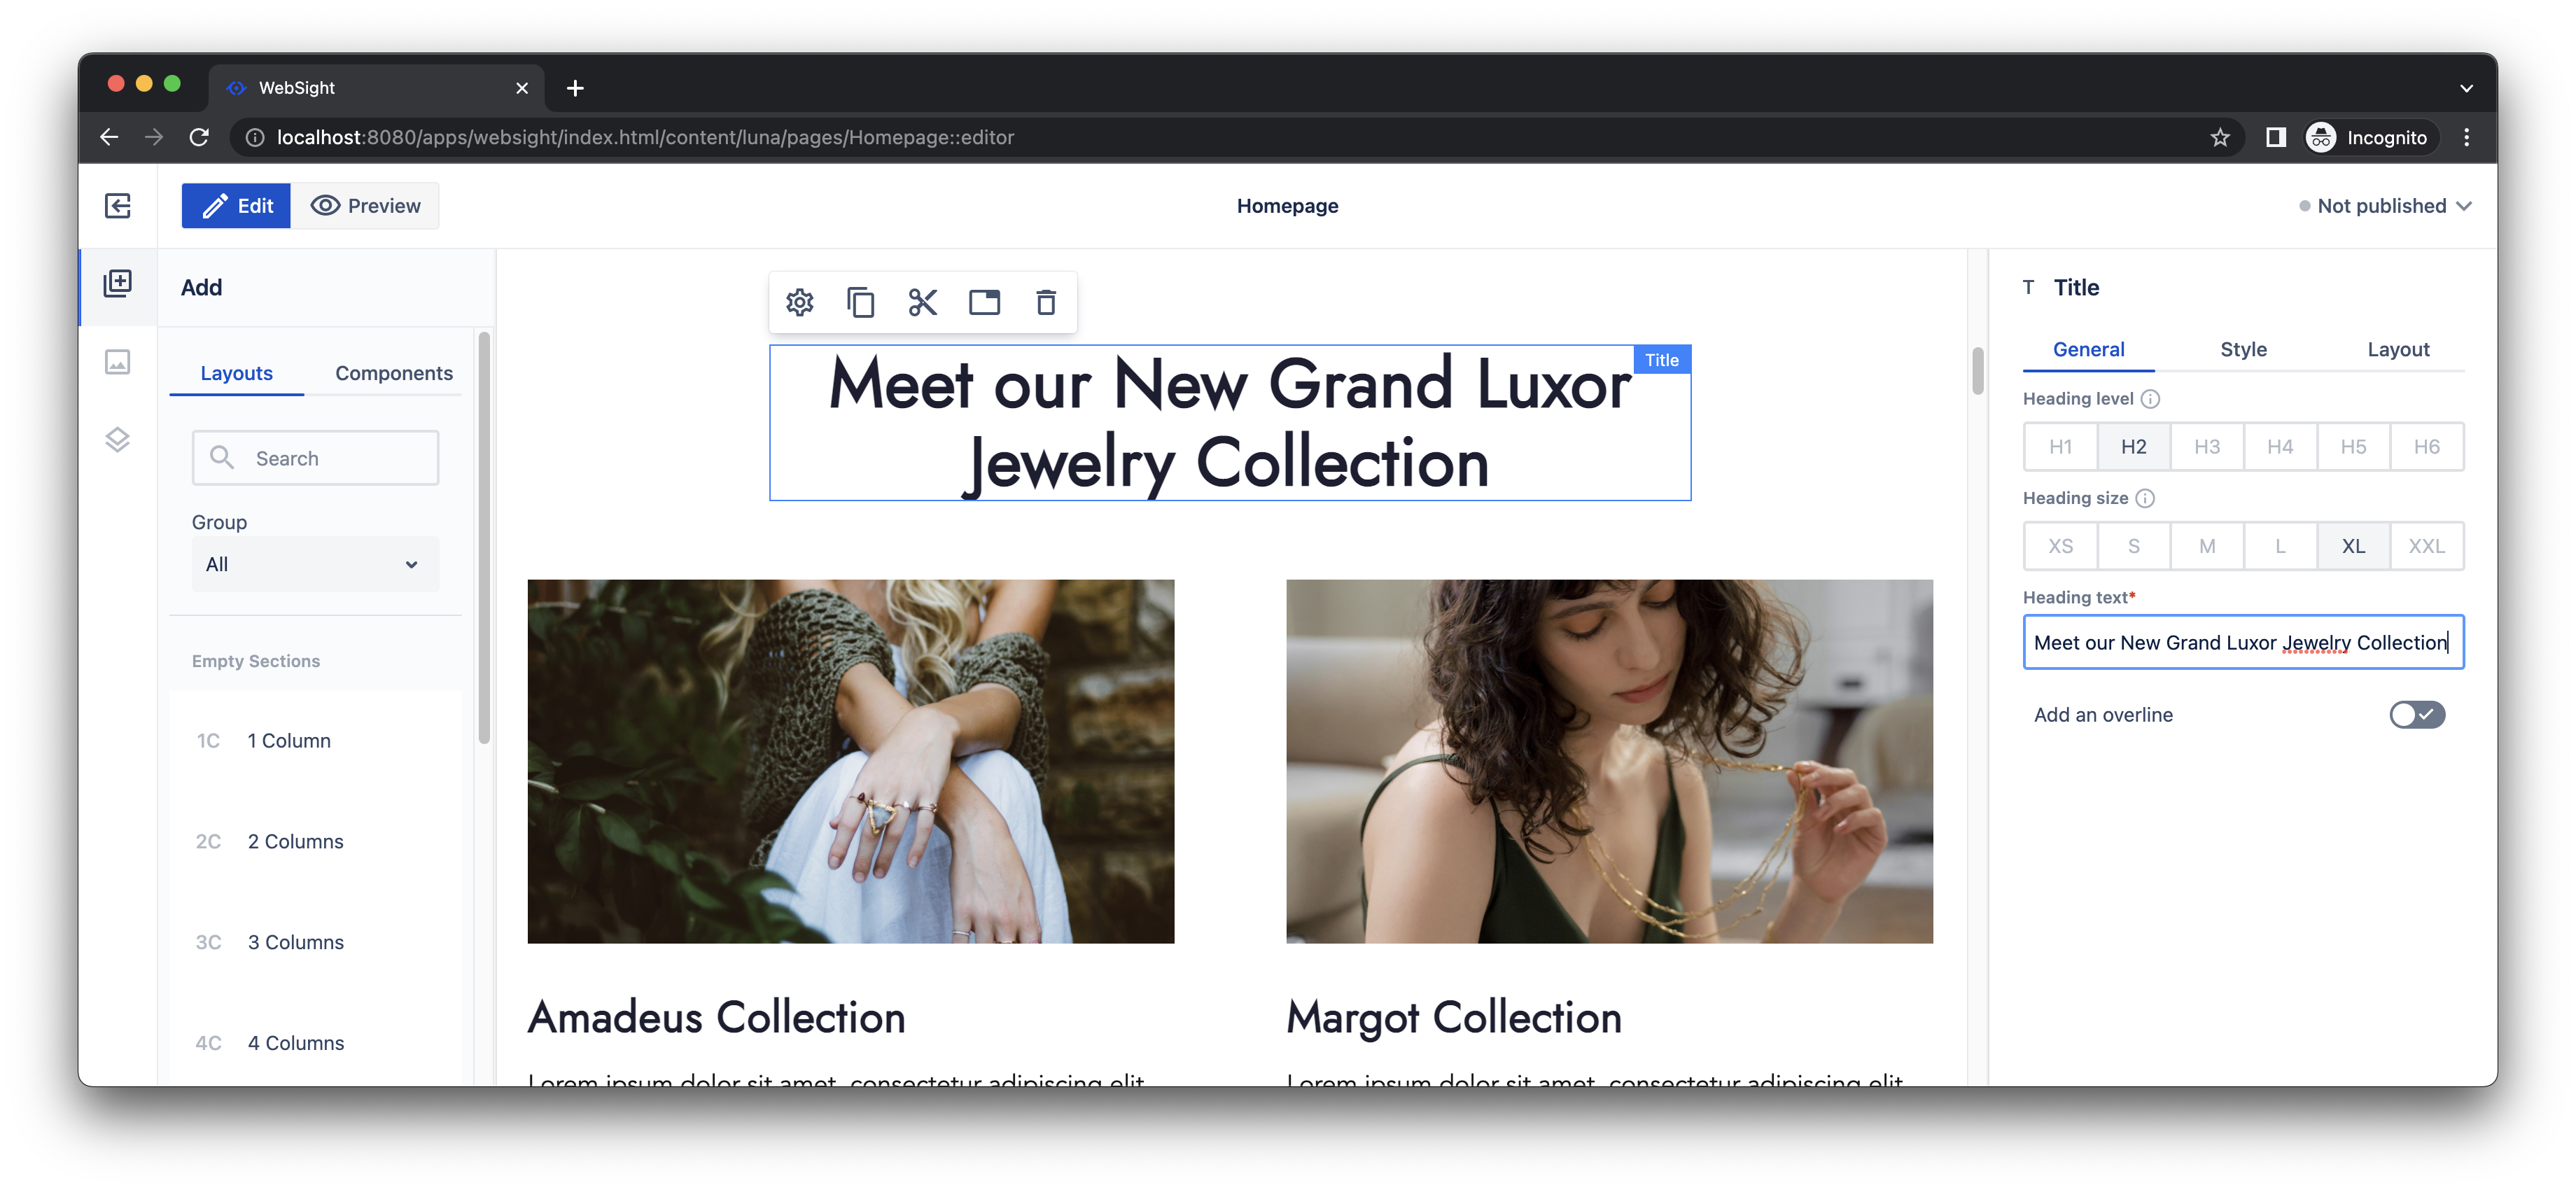
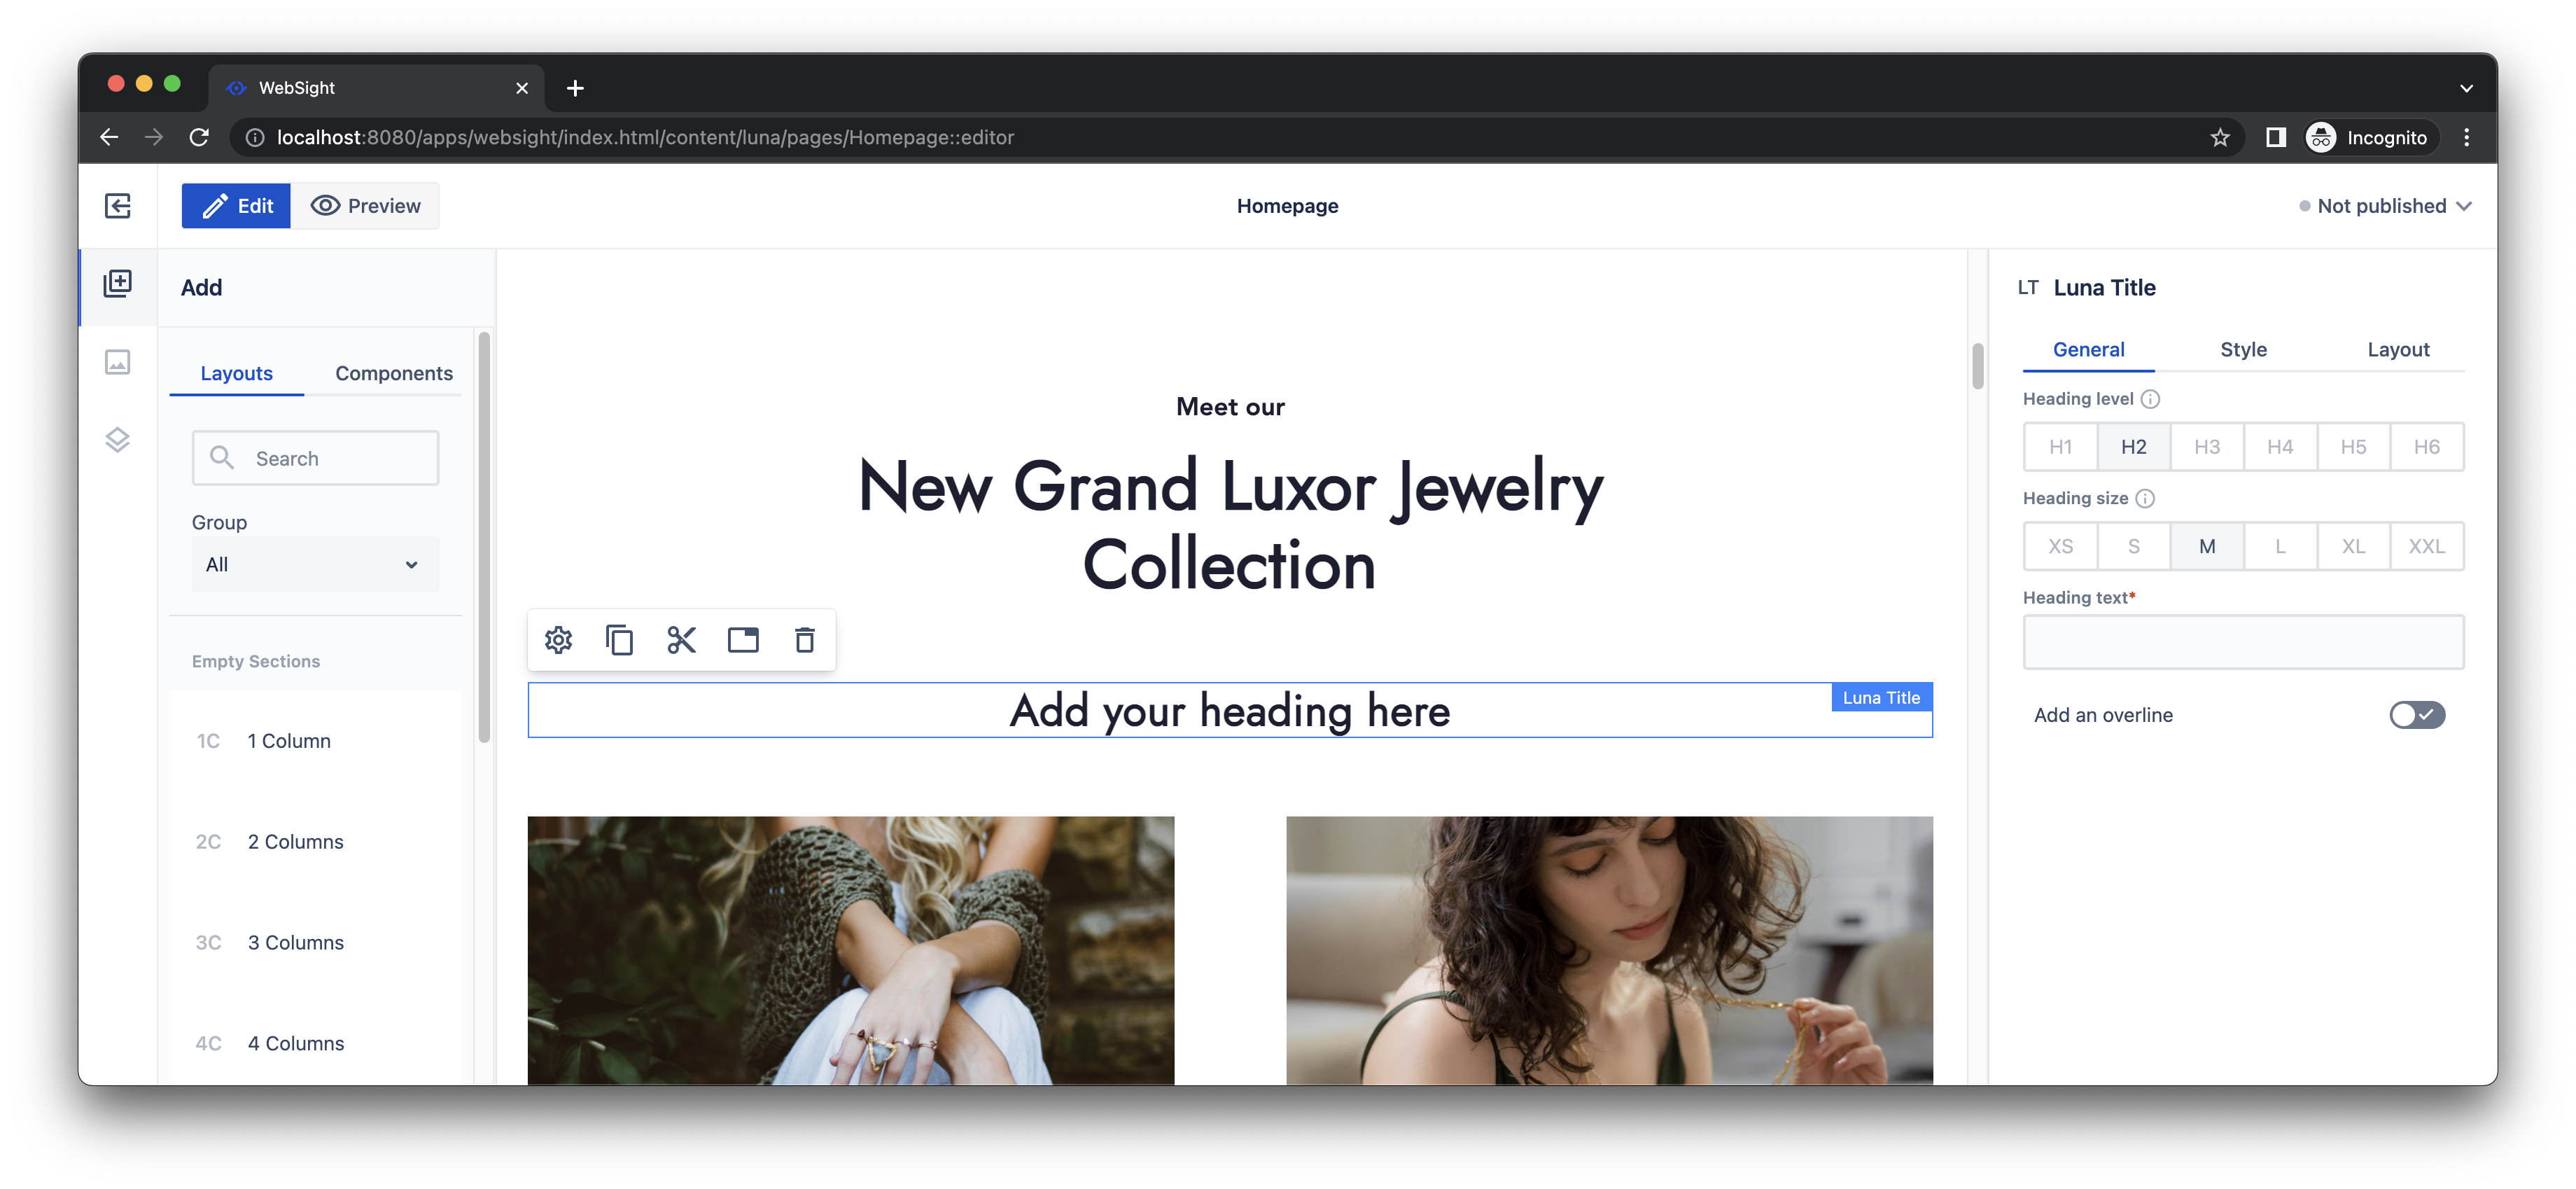
Enable the Overline text option, move Meet our from Heading text to Overline text.

As you can see, the result comes close to meeting the expectation, but the font size of the overline text is too small. You could prepare a new version of the Title component with a different font size for the overline text. However, this is not a flexible solution. Creating an additional input field to define the font size for the overline text is a better option.
Info
For simplicity, we overrode the original component in advance and prepared the Luna Title component. It is a part of the demo site project, but it is just a placeholder. It works exactly as the Title. The following sections guide you on how to implement the change.
Component update
Your task is to enable setup of the overline font size.
To start, first you need to add a new field, overlineSize, to the model class LunaTitleComponent.java. Let's define a default size hl-title__heading--size-5 according to the received design as well. The following Java code will do this:
package pl.ds.luna.components.models;

import javax.inject.Inject;
import org.apache.sling.api.resource.Resource;
import org.apache.sling.models.annotations.Default;
import org.apache.sling.models.annotations.Model;
import pl.ds.howlite.components.models.TitleComponent;

@Model(adaptables = Resource.class)
public class LunaTitleComponent extends TitleComponent {

  @Inject
  @Default(values = {"hl-title__heading--size-5"})
  private String overlineSize;

  public String getOverlineSize(){
    return overlineSize;
  }

}
Next, you need to update the component HTML template. The original one defines the CSS class that determines the font size as hl-title__heading--size-6.
<h6 class="hl-title__heading hl-title__heading--size-6"
    data-testid="overline">${model.subtitle}</h6>
<h6 class="hl-title__heading ${model.overlineSize}"
    data-testid="overline">${model.subtitle}</h6>
The last step is to add the field to the dialog used by authors. They need it to define component properties in the page editor. To enable this, you have to override the dialog definition from Howlite. Do so by creating a new dialog directory and put .content.json file inside.
{
  "tabs": {
    "generalTab": {
      "container": {
        "overlineSize": {
          "sling:resourceType": "wcm/dialogs/components/include",
          "sling:orderBefore": "overline",
          "path": "/libs/howlite/components/common/headingsize",
          "include": {
            "sling:resourceSuperType": "/libs/howlite/components/common/headingsize",
            "label": "Overline size",
            "name": "overlineSize",
            "description": "Changes font size",
            "s": {
              "selected": true
            },
            "m": {
              "selected": false
            }
          }
        }
      }
    }
  }
}
The above definition specifies the new overlineSize field. It is placed before the overline field and uses a heading size definition from Howlite, but with small size selected by default.
Apply changes
Run the following command to apply the changes to your local environment.
Part D: Use updated component
Hint
If you need help to navigate inside WebSight, see the general getting started for details.
The page owner can use the updated component now. Let's verify by checking it out in the admin interface.
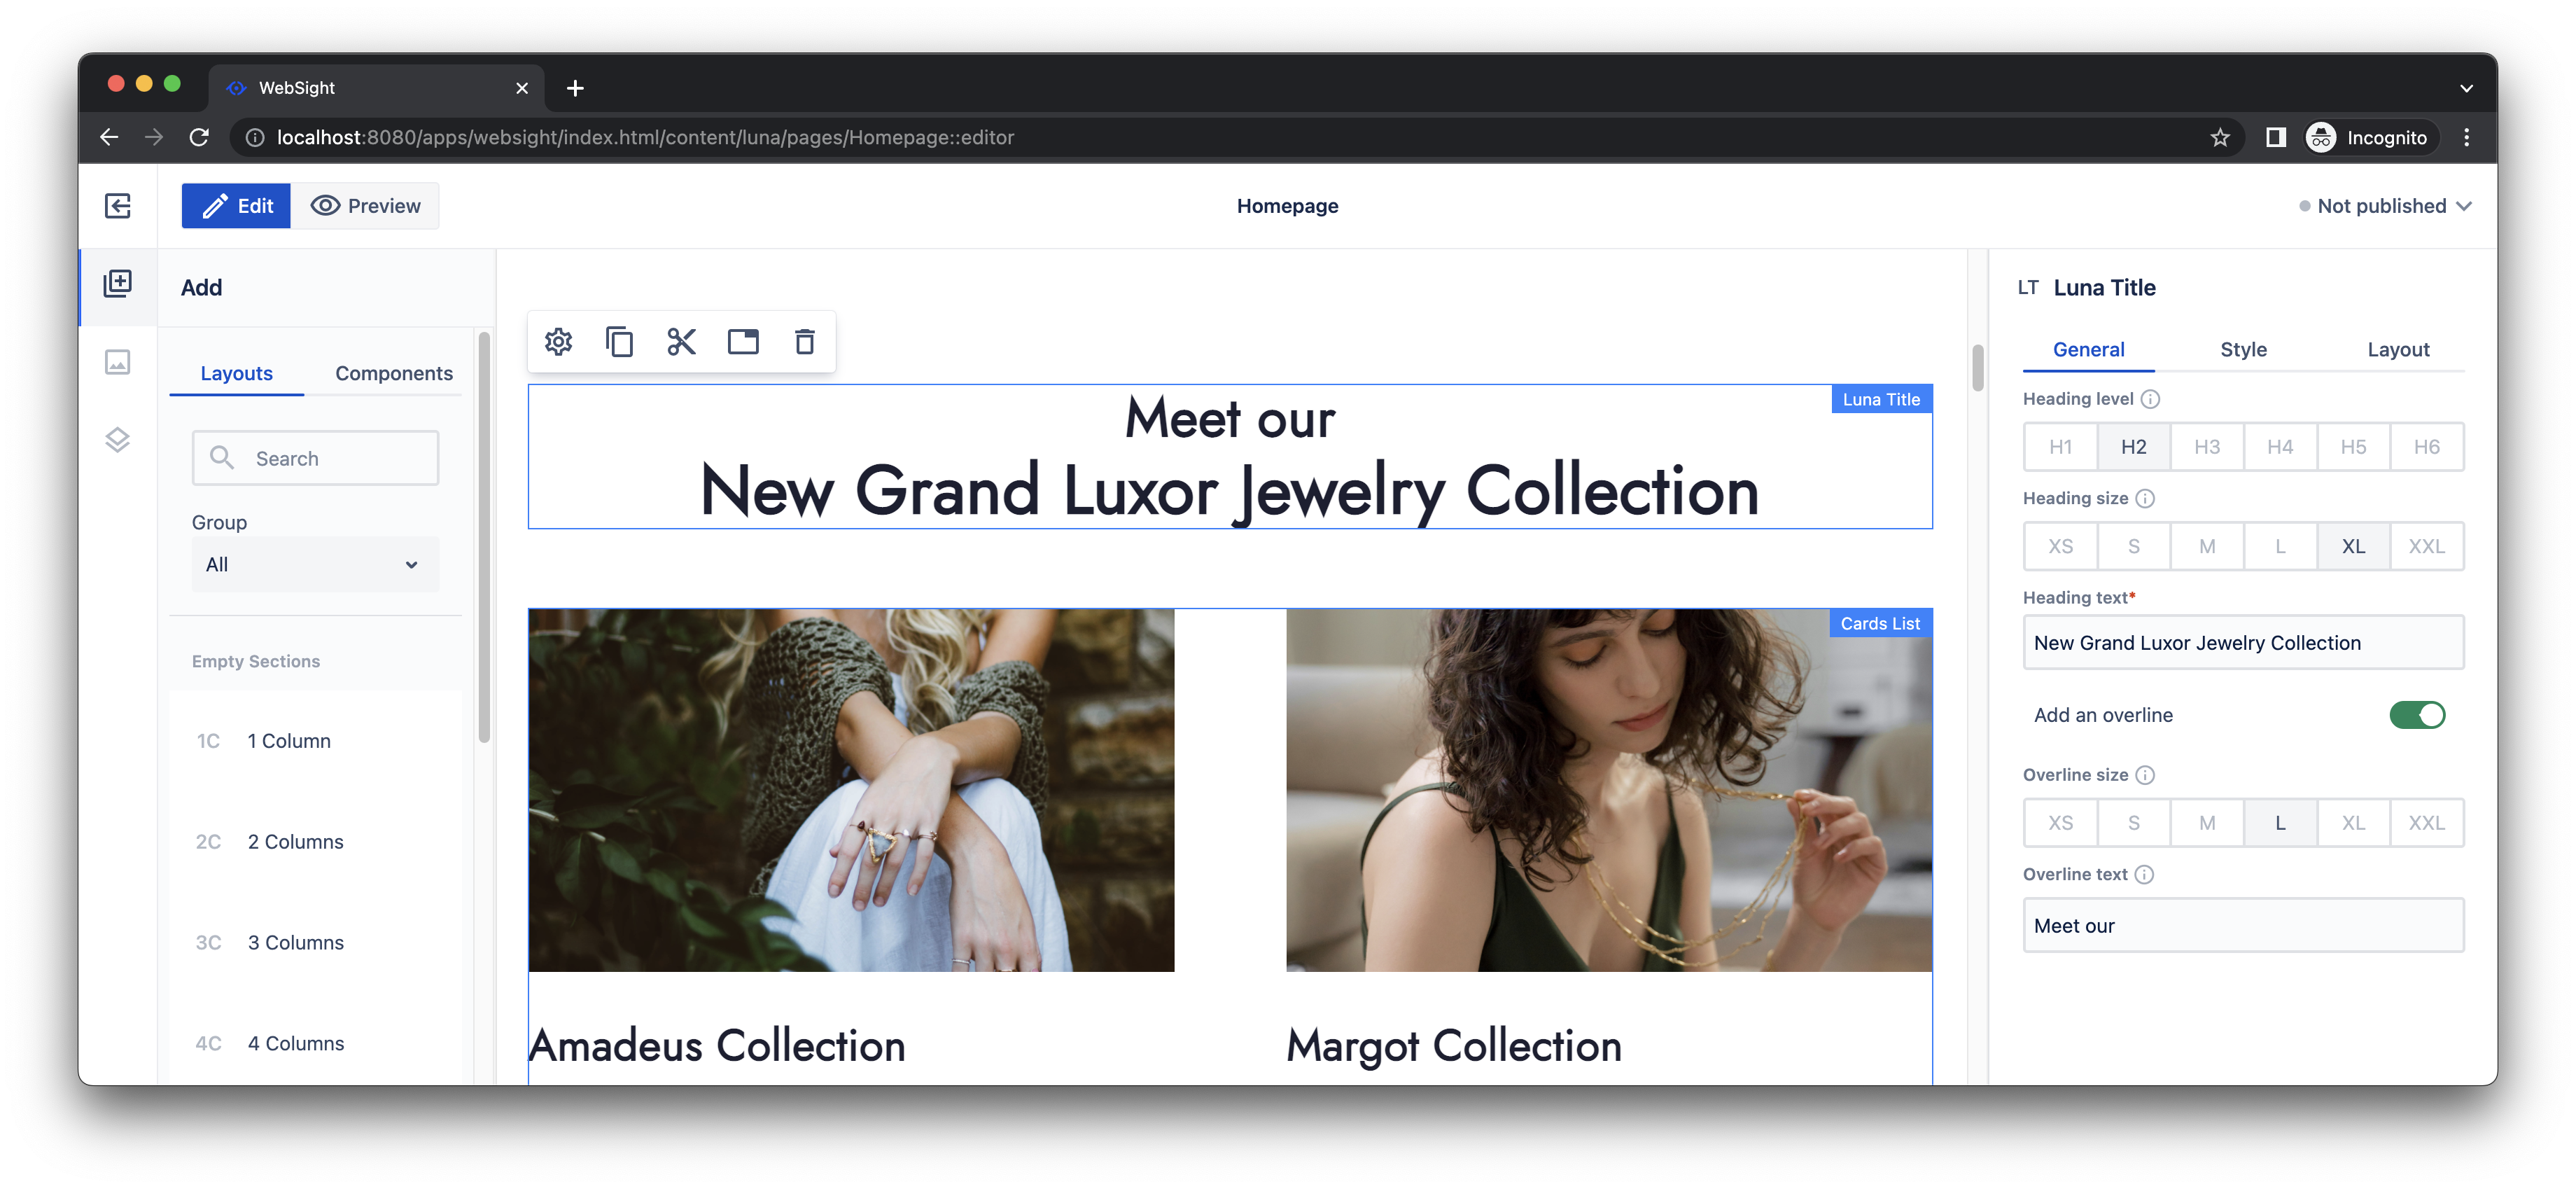
Switch to WebSight CMS, open the Luna space, and edit the home page. Find the Title with text Meet our New Grand Luxor Jewelry Collection.
Then, find the Luna Title in the component tree on the left. Drag and drop the component on the page just below the original one.
Edit properties of the Luna Title on the side panel:
- set Heading level to
H2 - set Heading size to
XL - set Heading text to
New Grand Luxor Jewelry Collection - enable overline text
- set Overline size to
L - set Overline text to
Meet our
The title should appear as expected now. You can delete the original Title component to finalize the change.
Part E: Clean-up
Stop the environment
After completing this guide, you can stop your local environment by hitting Ctrl+C in the terminal window where you started it.
The environment will still exist but will no longer be running.
Delete environment
If you don't need your environment anymore, you can delete it permanently by running the following command (depending on your choice of running the CMS as a JVM application or using Docker):
JVM application
Remove the launcher directory created by your local environment.
Next steps
This guide walked through the essentials of developing components for WebSight CMS. As a next step, we encourage you to explore additional details about the following: